Weddings
DIY Wedding Backdrop
Add a personalized background to your big day with a homemade backdrop in your favorite fabric.
By Savannah Waszczuk | Photo by Christian Gideon Photography
Dec 2015

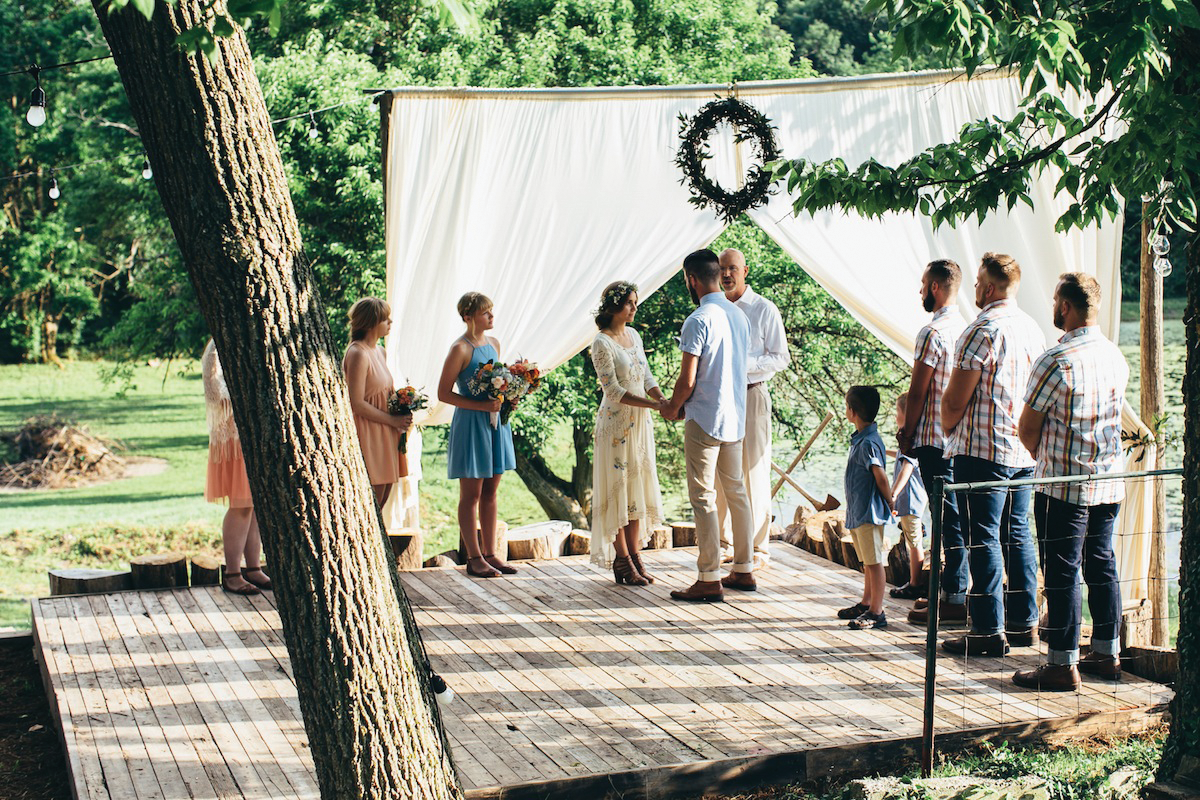
When Nathan Stracke and Sarah Thomas were planning their wedding, deciding on a venue was easy: The two wanted to get married at Nathan’s family farm. “Our style is really easy-going,” Sarah says. The two were planning their wedding on the summer solstice, June 21, 2014, so they knew there would be plenty of golden daylight to take in the gorgeous surrounding countryside.
The two chose a variety of soft natural elements to help make the natural landscape even more beautiful. “We chose décor to complement our surroundings,” Sarah says. This included lace tablecloths from Sarah’s grandmother, second-hand flowers from floral shops and touches of gold and silver with a collection of painted vases, silverware and cups on the tables.
Many of the day’s other personal touches were made possible by Sarah’s mom. “She was key in helping me with the important parts of our ceremony,” Sarah says. “She added colored embroidery to my dress, assembled our ceremony wreath and sewed our backdrop.”
Made with simple cotton fabric, thread and a sewing machine, the backdrop provided a perfect frame behind the couple during the ceremony. “I visualized the backdrop idea when Nate and I were walking around his parents’ acreage,” Sarah says. “We knew we needed some embellishment to create an altar-like feel.” It took Sarah’s mom about four to six hours to complete the piece, which was made by sewing a few pieces of fabric together. Learn how to make your own with these step-by-step directions.
Make It:
For the Fabric:
Measure the width of the area, and multiply it by 1½. Add 1 inch for each of the seams, and 4 inches for each of the finished edges. Also measure the length, and add 12 inches to allow for a top pocket and bottom hem. You will likely need to buy several pieces and sew them together. You will make two panels total.
What You Need:
Sewing machine
Muslin, cotton or any other material you like
One spool of the same colored thread
Hanging system of choice (they made their own with PVC pipe)
What You Do:
1. Lay out the fabric, and sew your panels together with French seams to reach your width. The French seams help your curtain look finished from either side.
2. Fold the middles and edges over 1 inch, then fold over again, and stitch next to the fold (approximately ⅞ inches from edge).
3. For the bottom, fold over 3 inches and 3 inches again. Stitch next to the fold (2 ⅞ inches from edge).
4. For the top hem, fold the material over 3 inches, then fold over 3 inches again. Stitch across 1 inch from the edge, then stitch across 2 ₆⁄₈ inches from edge.
5. If you need to weight the corners, sew large washers to the inside of your curtain.
6. If you need the curtain to come together, slip stitch the two panels down the center.
7. Place the panels on your chosen hanging system.


